xUnit and Pipeline
| This is a guest post by Liam Newman, Technical Evangelist at CloudBees. |
The JUnit plugin is the go-to test result reporter for many Jenkins projects, but the it is not the only one available. The xUnit plugin is a viable alternative that supports JUnit and many other test result file formats.
Introduction
No matter the project, you need to gather and report test results. JUnit is one of the most widely supported formats for recording test results. For a scenarios where your tests are stable and your framework can produce JUnit output, this makes the JUnit plugin ideal for reporting results in Jenkins. It will consume results from a specified file or path, create a report, and if it finds test failures it will set the the job state to "unstable" or "failed".
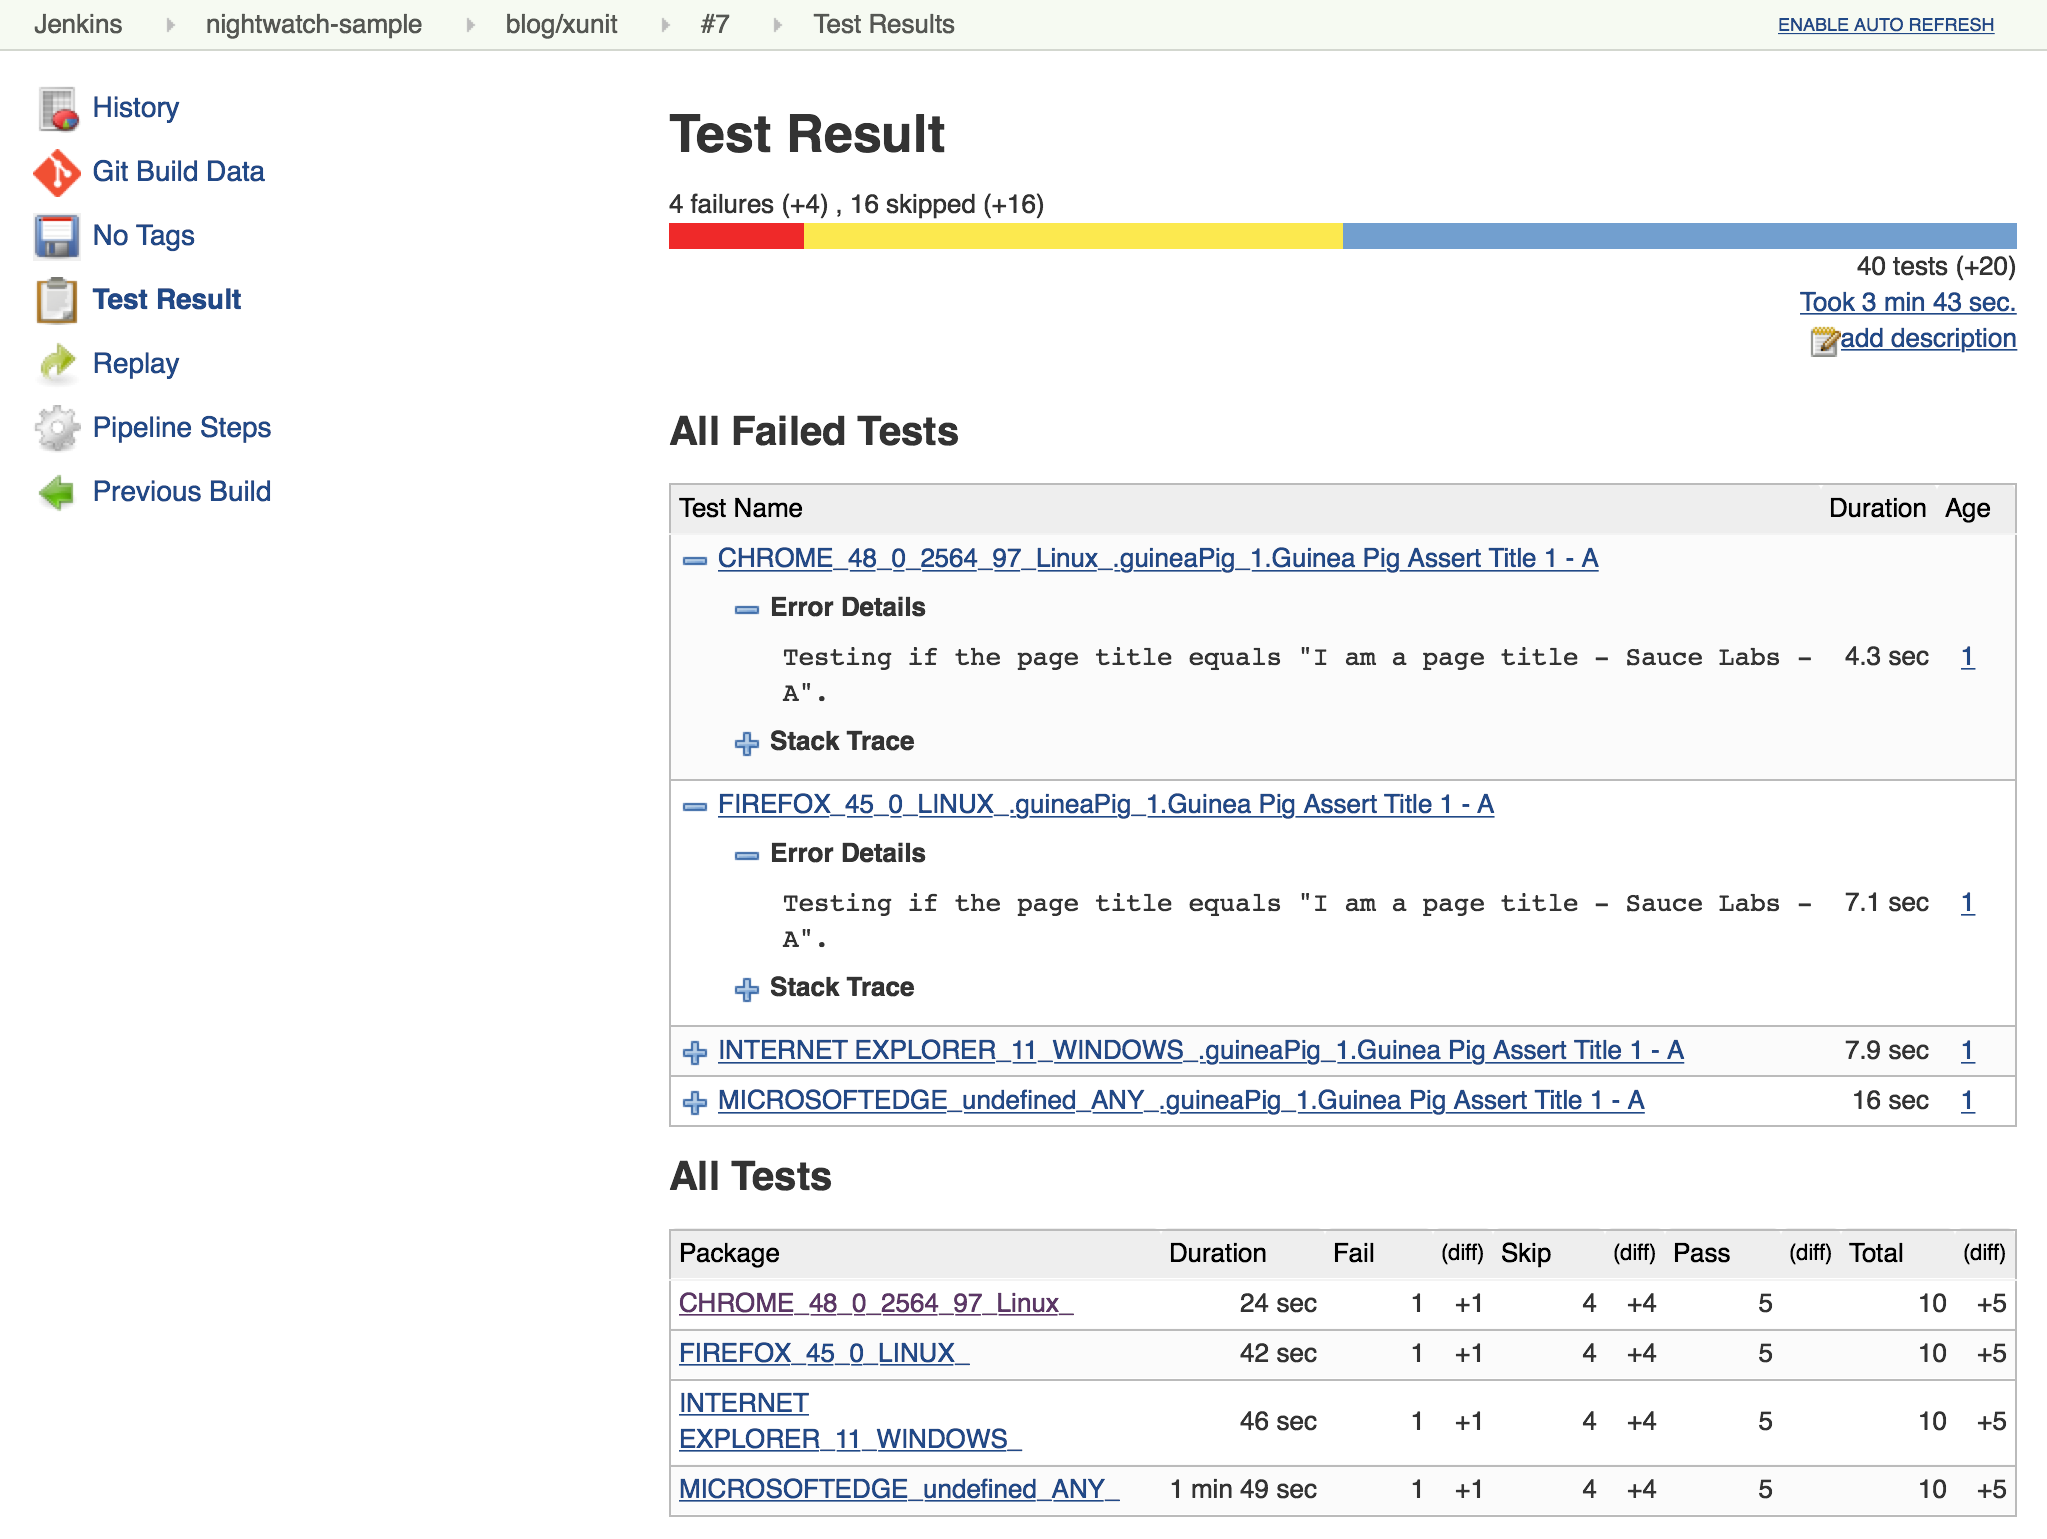
There are also plenty of scenarios where the JUnit plugin is not enough. If your project has some failing tests that will take some time to fix, or if there are some flaky tests, the JUnit plugin’s simplistic view of test failures may be difficult to work with.
No problem, the Jenkins plugin model lets us replace the JUnit plugin functionality with similar functionality from another plugin and Jenkins Pipeline lets us do this in safe stepwise fashion where we can test and debug each of our changes.
In this article, I will show you how to replace the JUnit plugin with the xUnit plugin in Pipeline code to address a few common test reporting scenarios.
Initial Setup
I’m going to use the "JS-Nightwatch.js" sample project from my previous post to demonstrate a couple common scenarios that the xUnit handles better. I already have the latest JUnit plugin and xUnit plugin installed on my Jenkins server.
I’ll be keeping my changes in link:my fork of the "JS-Nightwatch.js" sample project on GitHub, under the "blog/xunit" branch.
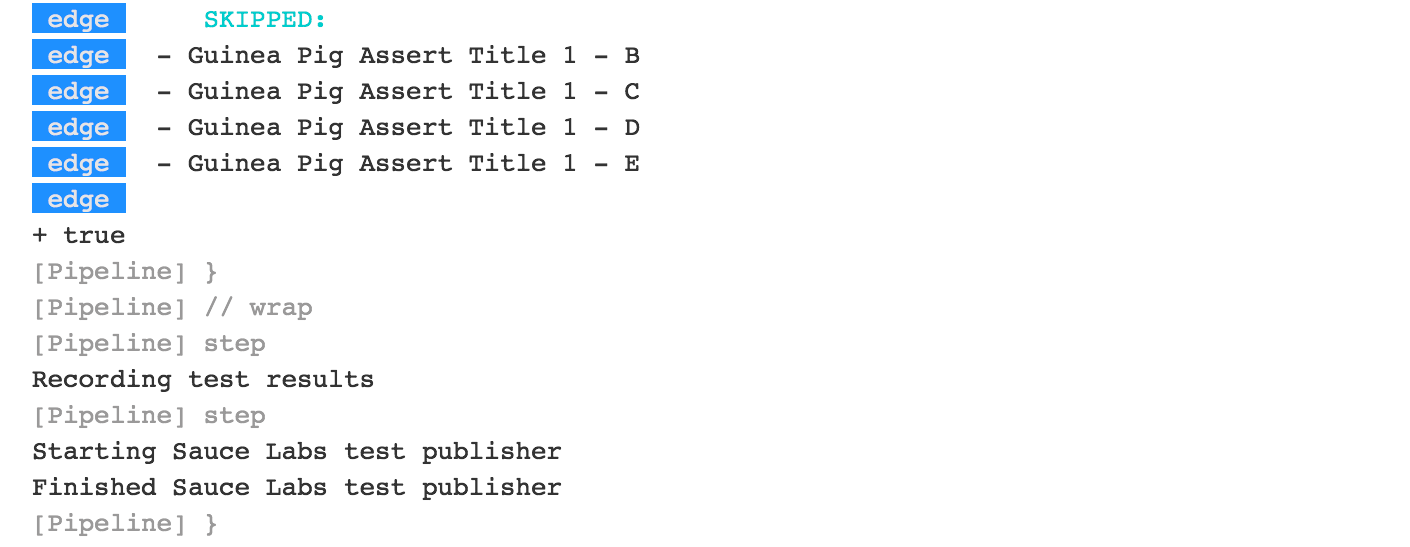
Here’s what the Jenkinsfile looked like at the end of that previous post and what the report page looks like after a few runs:
node {
    stage "Build"
    checkout scm

    // Install dependencies
    sh 'npm install'

    stage "Test"
    // Add sauce credentials
    sauce('f0a6b8ad-ce30-4cba-bf9a-95afbc470a8a') {
        // Start sauce connect
        sauceconnect(options: '', useGeneratedTunnelIdentifier: false, verboseLogging: false) {

            // List of browser configs we'll be testing against.
            def platform_configs = [
                'chrome',
                'firefox',
                'ie',
                'edge'
            ].join(',')

            // Nightwatch.js supports color output, so wrap this step for ansi color
            wrap([$class: 'AnsiColorBuildWrapper', 'colorMapName': 'XTerm']) {
                // Run selenium tests using Nightwatch.js
                // Ignore error codes. The junit publisher will cover setting build status.
                sh "./node_modules/.bin/nightwatch -e ${platform_configs} || true"
            }

            junit 'reports/**'

            step([$class: 'SauceOnDemandTestPublisher'])
        }
    }
}
Switching from JUnit to xUnit
I’ll start by replacing JUnit with xUnit in my pipeline.
I use the Snippet Generator to create the step with the right parameters.
The main downside of using the xUnit plugin is that while it is Pipeline compatible,
it still uses the more verbose step() syntax and has some very rough edges around that, too.
I’ve filed
JENKINS-37611
but in the meanwhile, we’ll work with what we have.
// Original JUnit step
junit 'reports/**'

// Equivalent xUnit step - generated (reformatted)
step([$class: 'XUnitBuilder', testTimeMargin: '3000', thresholdMode: 1,
    thresholds: [
        [$class: 'FailedThreshold', failureNewThreshold: '', failureThreshold: '', unstableNewThreshold: '', unstableThreshold: '1'],
        [$class: 'SkippedThreshold', failureNewThreshold: '', failureThreshold: '', unstableNewThreshold: '', unstableThreshold: '']],
    tools: [
        [$class: 'JUnitType', deleteOutputFiles: false, failIfNotNew: false, pattern: 'reports/**', skipNoTestFiles: false, stopProcessingIfError: true]]
    ])

// Equivalent xUnit step - cleaned
step([$class: 'XUnitBuilder',
    thresholds: [[$class: 'FailedThreshold', unstableThreshold: '1']],
    tools: [[$class: 'JUnitType', pattern: 'reports/**']]])
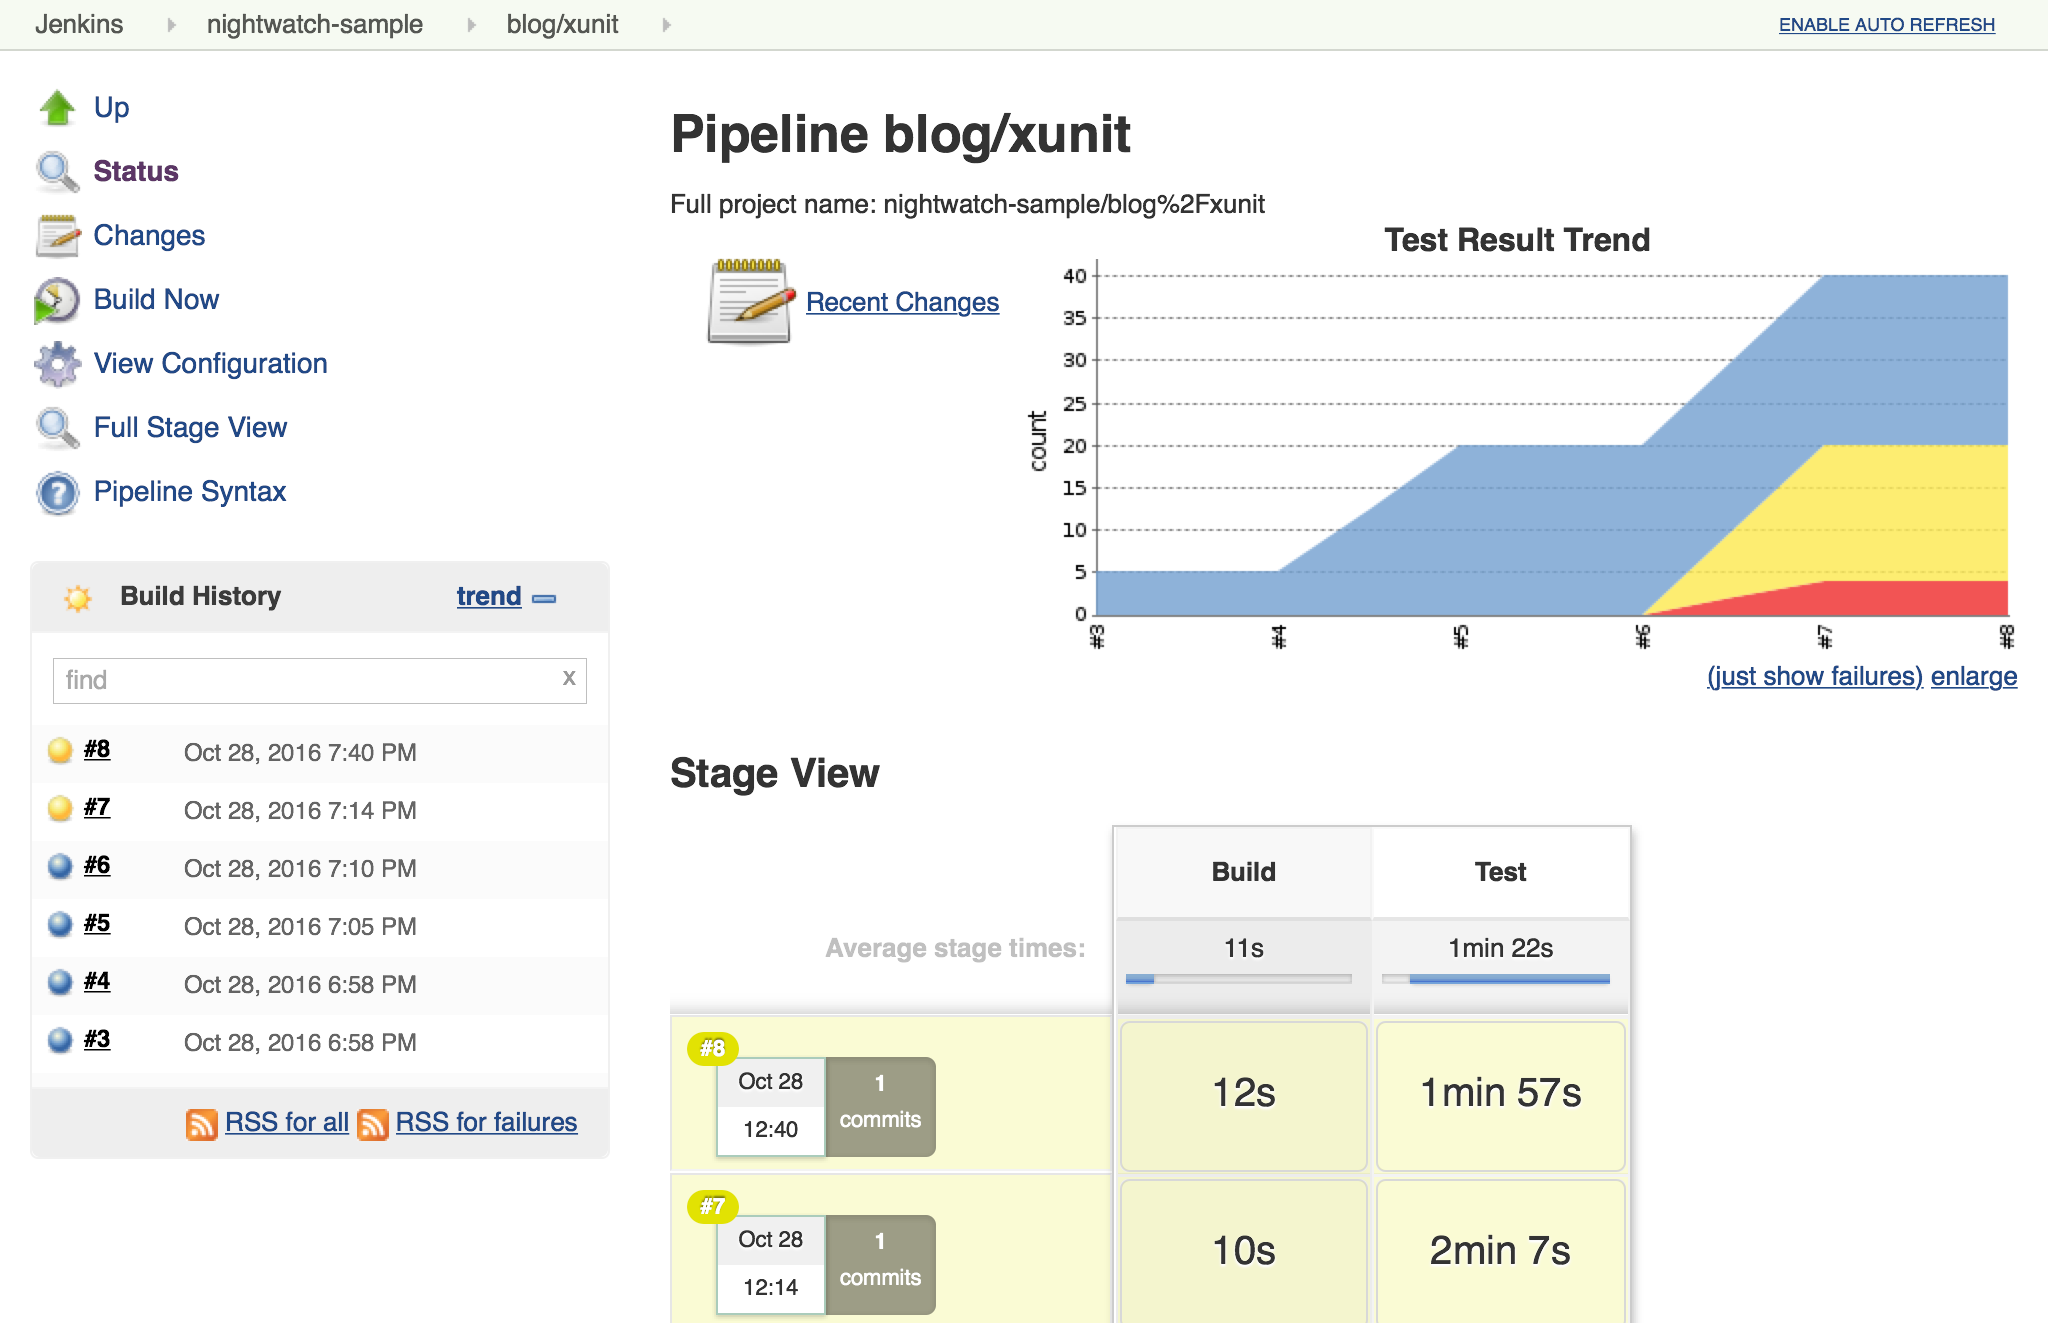
If I replace the junit step in my Jenkinsfile with that last step above,
it produces a report and job result identical to the JUnit plugin but using the xUnit plugin. Easy!
node {
    stage "Build"
    // ... snip ...

    stage "Test"
    // Add sauce credentials
    sauce('f0a6b8ad-ce30-4cba-bf9a-95afbc470a8a') {
        // Start sauce connect
        sauceconnect(options: '', useGeneratedTunnelIdentifier: false, verboseLogging: false) {

            // ... snip ...

            // junit 'reports/**'
            step([$class: 'XUnitBuilder',
                thresholds: [[$class: 'FailedThreshold', unstableThreshold: '1']],
                tools: [[$class: 'JUnitType', pattern: 'reports/**']]])

            // ... snip ...
        }
    }
}
Accept a Baseline
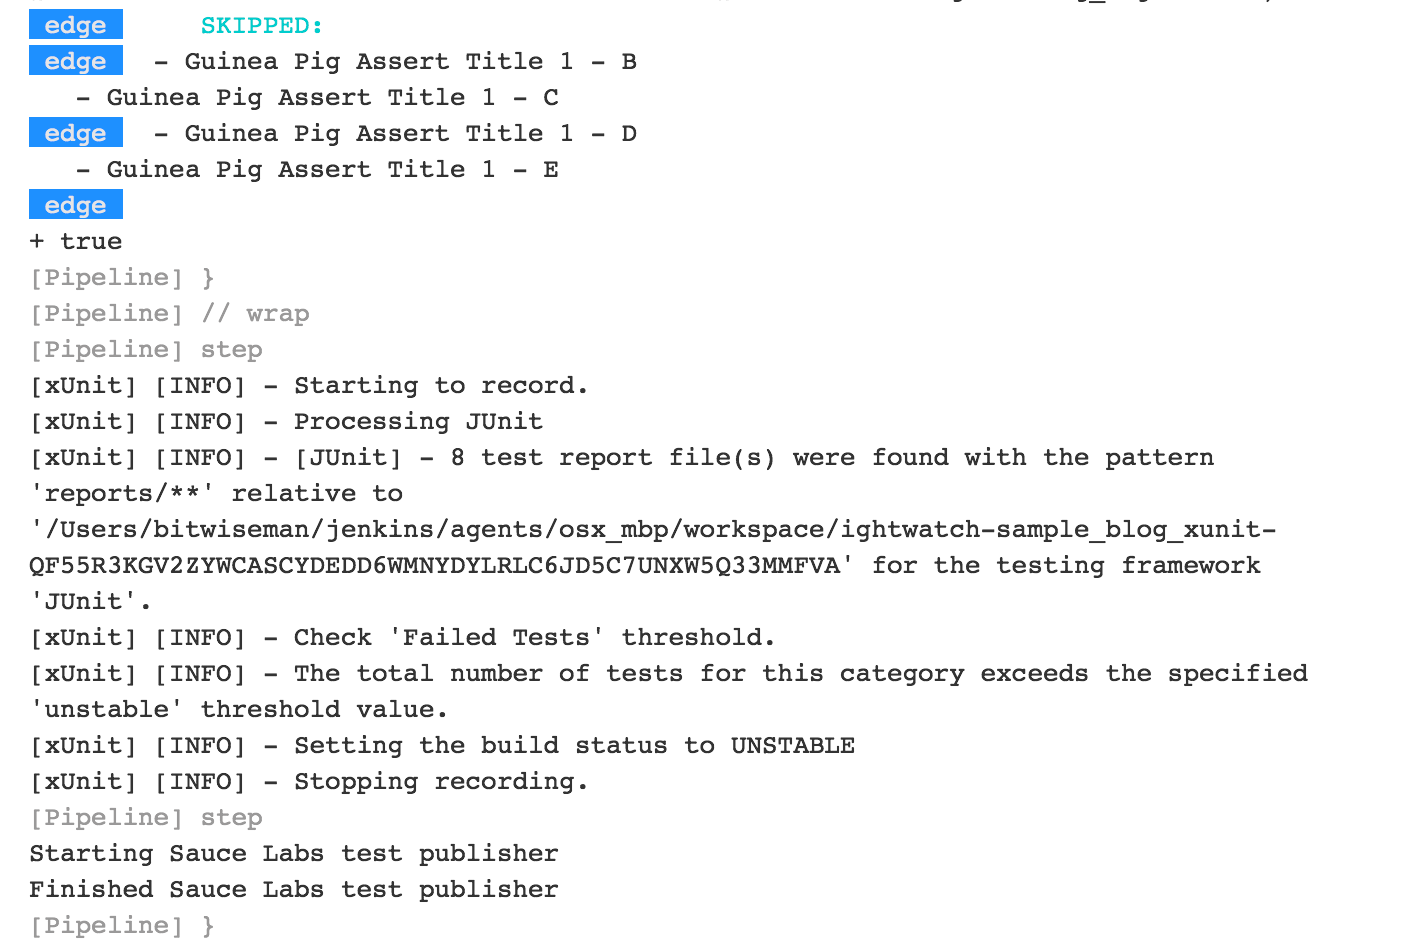
Most projects don’t start off with automated tests passing or even running. They start with a people hacking and prototyping, and eventually they start to write tests. As new tests are written, having tests checked-in, running, and failing can be valuable information. With the xUnit plugin we can accept a baseline of failed cases and drive that number down over time.
I’ll start by changing the Jenkinsfile to fail jobs only if the number of failures is greater than an expected baseline, in this case four failures. When I run the job with this change, the reported numbers remain the same, but the job passes.
// The rest of the Jenkinsfile is unchanged.
// Only the xUnit step() call is modified.
step([$class: 'XUnitBuilder',
    thresholds: [[$class: 'FailedThreshold', failureThreshold: '4']],
    tools: [[$class: 'JUnitType', pattern: 'reports/**']]])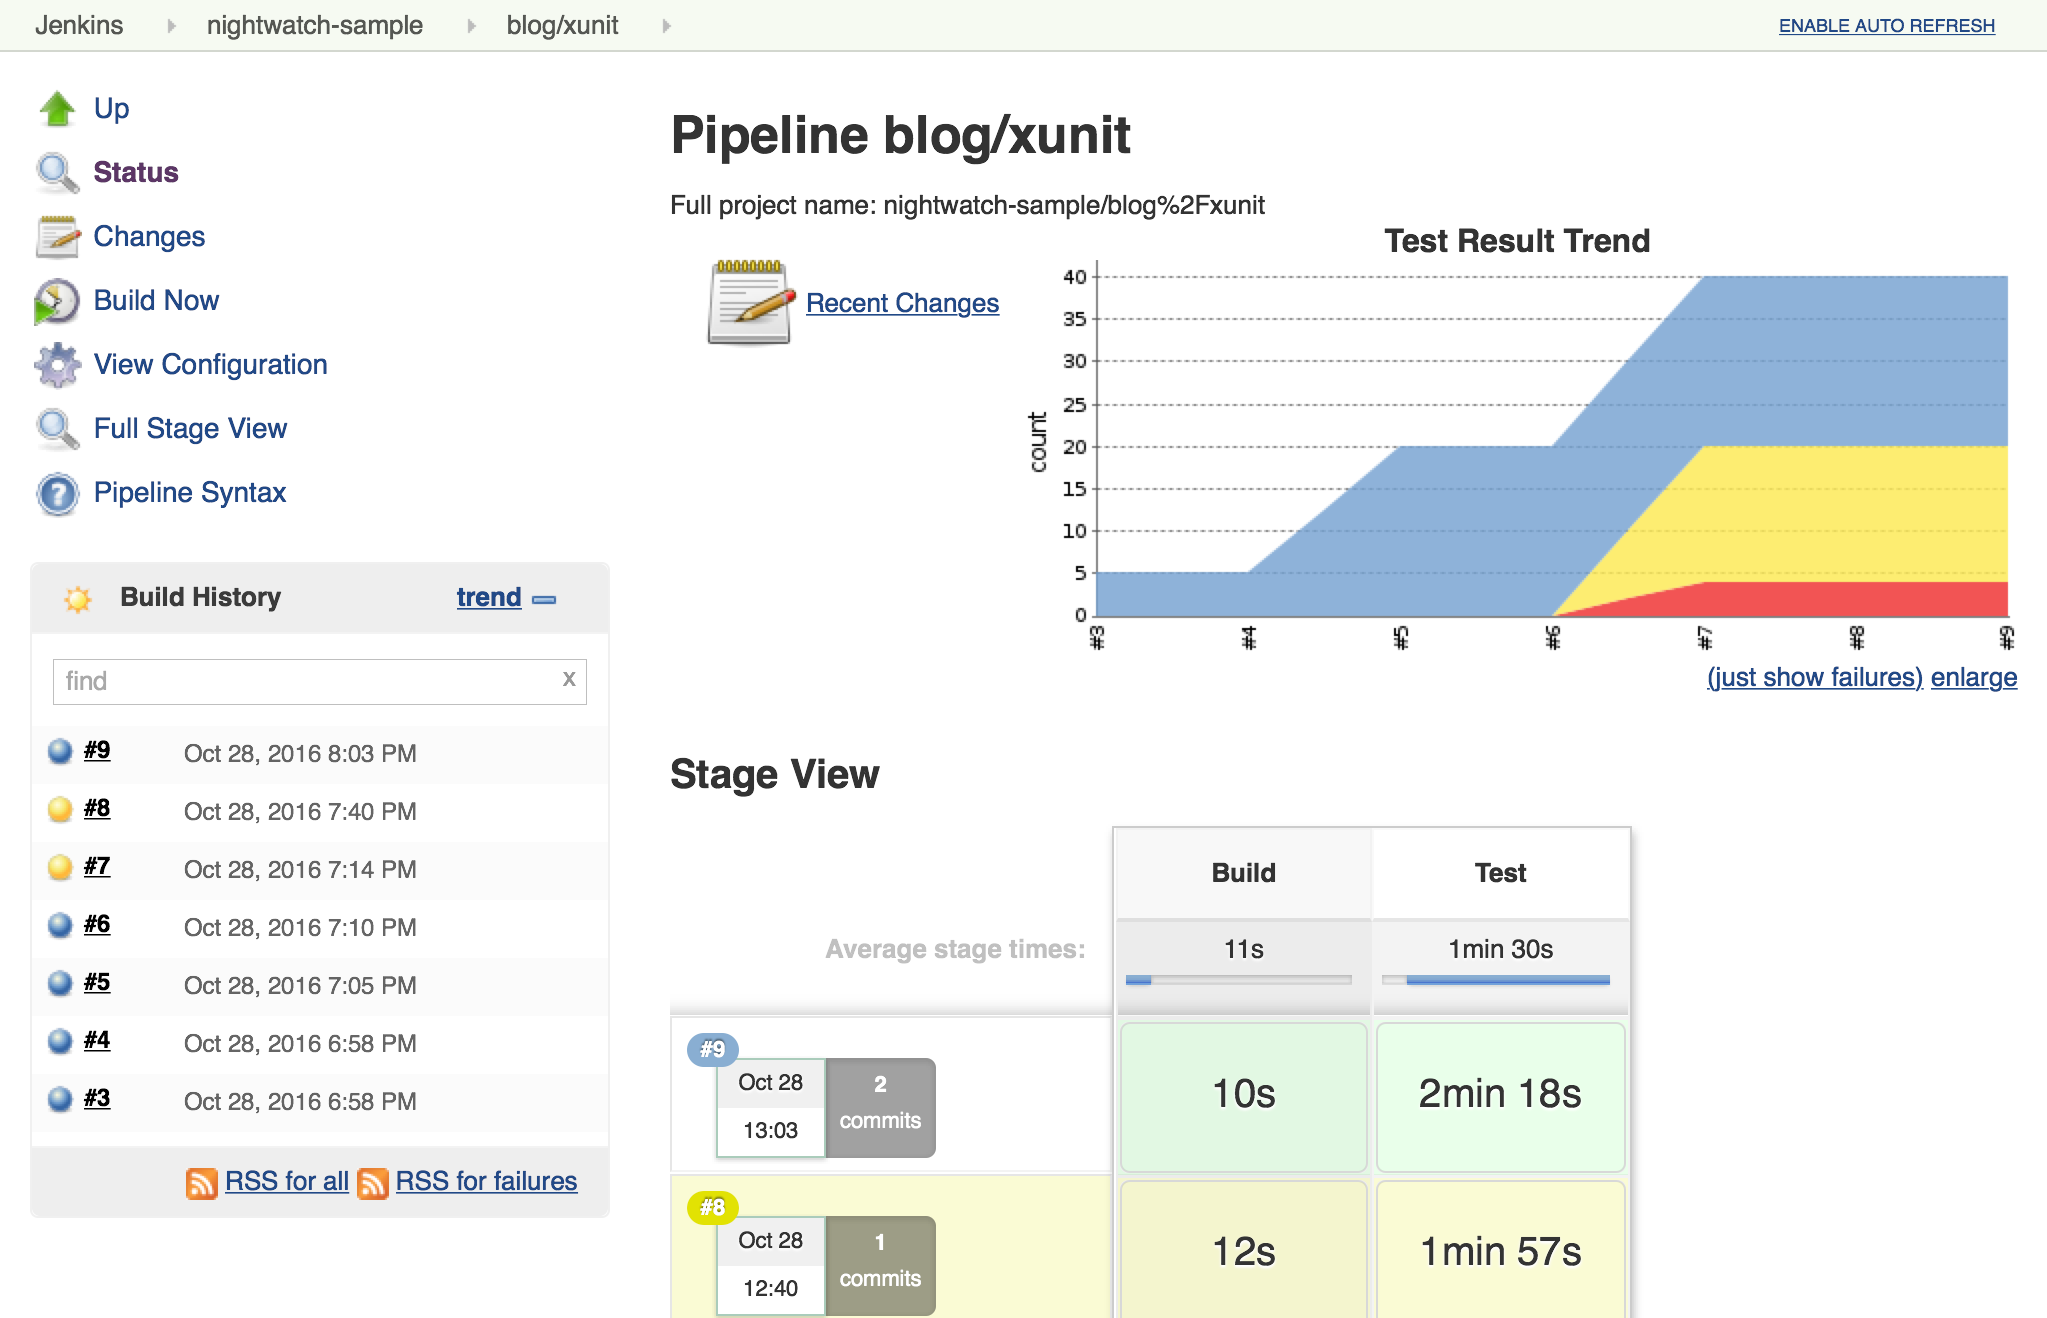
Next, I can also check that the plugin reports the job as failed if more failures occur. Since this is sample code, I’ll do this by adding another failing test and checking the job reports as failed.
// ... snip ...

    'Guinea Pig Assert Title 0 - D': function(client) { /* ... */ },

    'Guinea Pig Assert Title 0 - E': function(client) {
        client
            .url('https://saucelabs.com/test/guinea-pig')
            .waitForElementVisible('body', 1000)
            //.assert.title('I am a page title - Sauce Labs');
            .assert.title('I am a page title - Sauce Labs - Cause a Failure');
    },

    afterEach: function(client, done) { /* ... */ }

// ... snip ...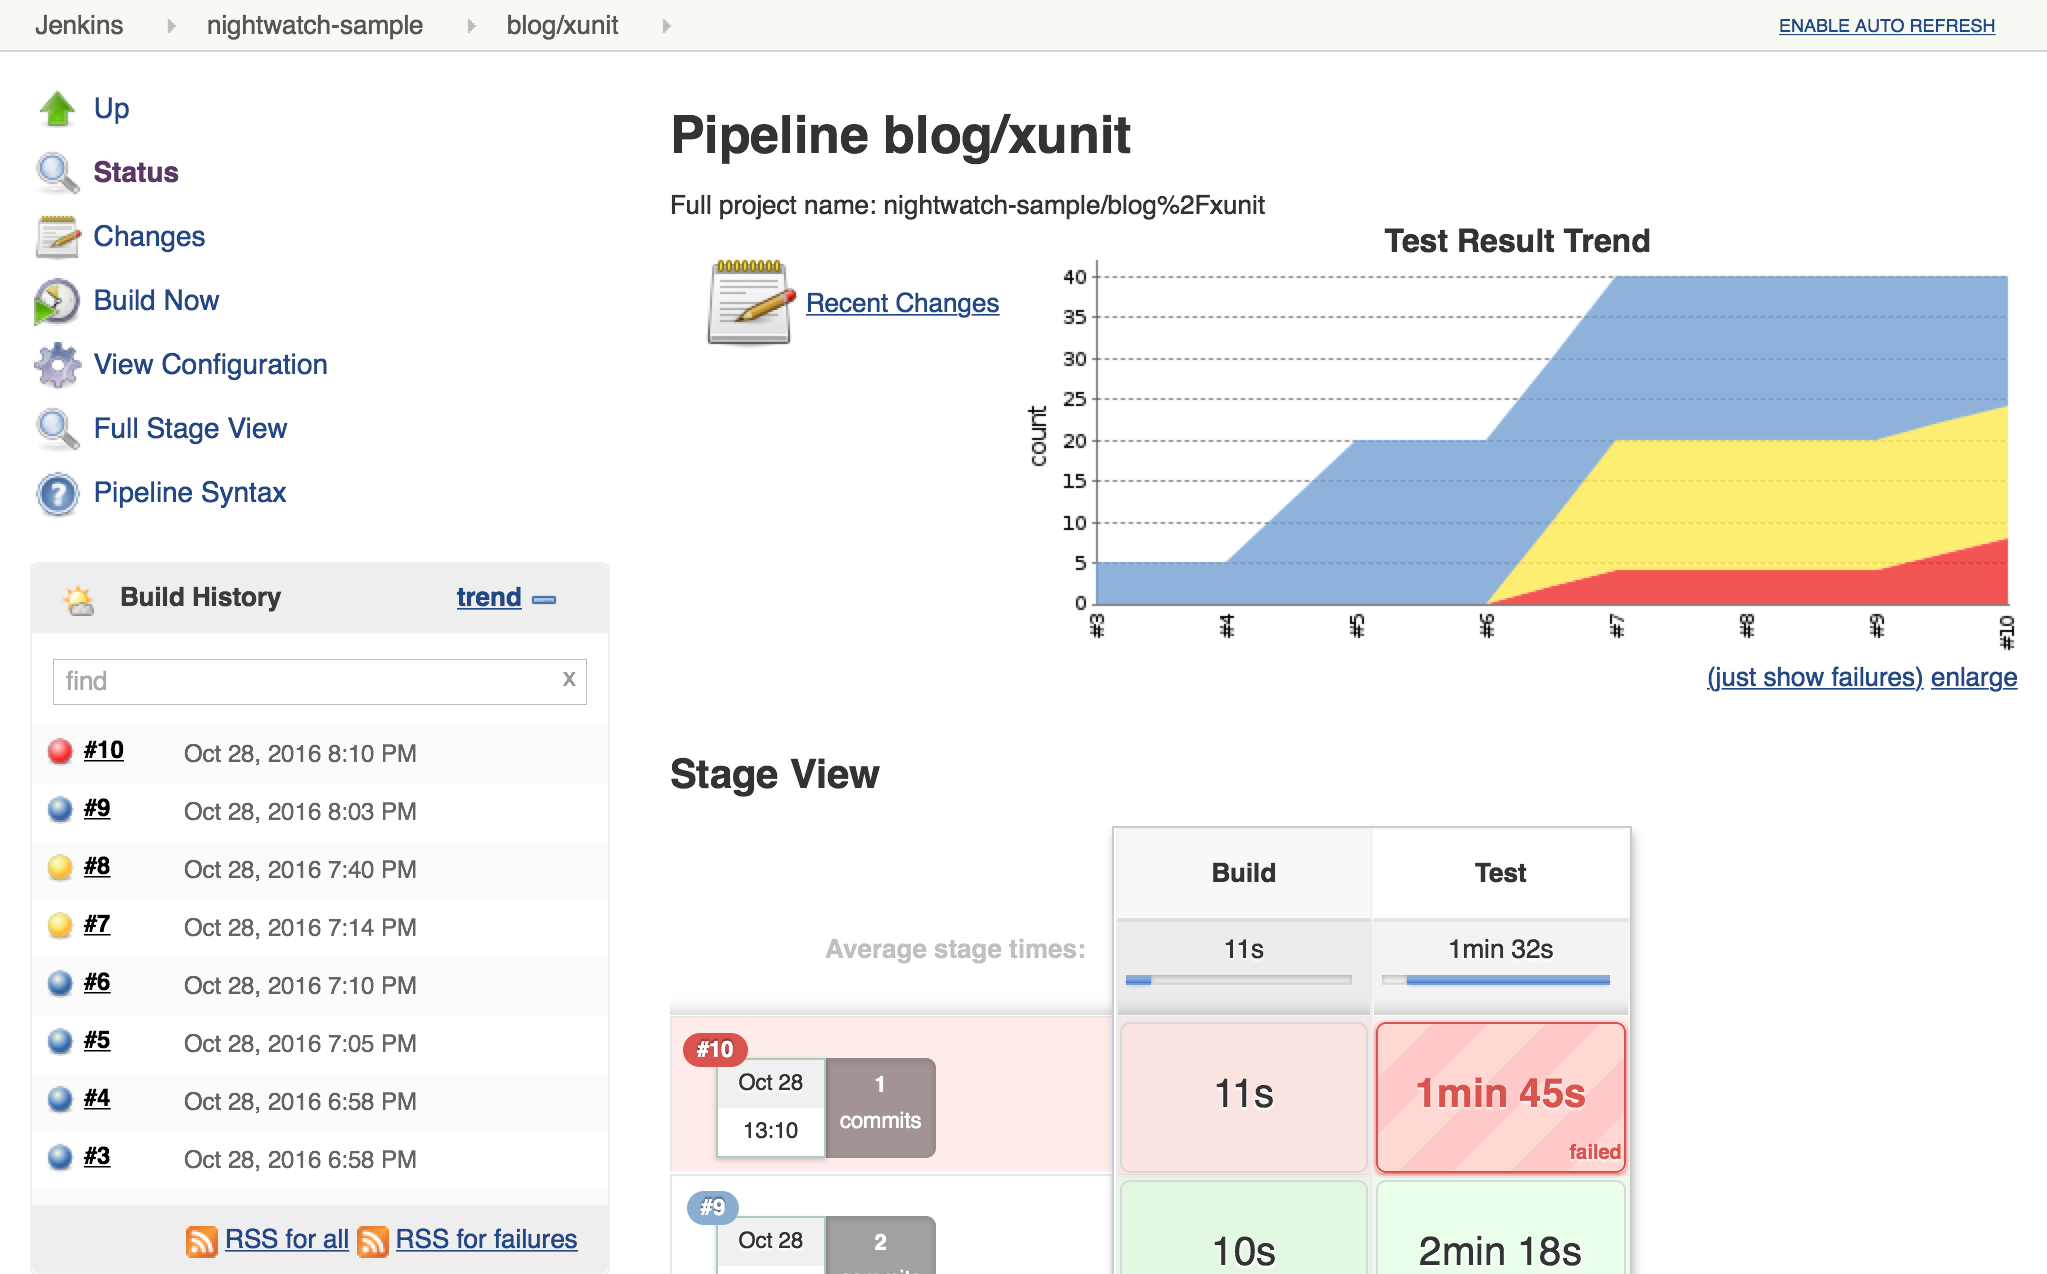
In a real project, we’d make fixes over a number of commits bringing the number of failures down and adjusting our baseline. Since this is a sample, I’ll just make all tests pass and set the job failure threshold for failed and skipped cases to zero.
// The rest of the Jenkinsfile is unchanged.
// Only the xUnit step() call is modified.
step([$class: 'XUnitBuilder',
    thresholds: [
        [$class: 'SkippedThreshold', failureThreshold: '0'],
        [$class: 'FailedThreshold', failureThreshold: '0']],
tools: [[$class: 'JUnitType', pattern: 'reports/**']]])// ... snip ...
'Guinea Pig Assert Title 0 - D': function(client) { /* ... */ },
'Guinea Pig Assert Title 0 - E': function(client) {
client
.url('https://saucelabs.com/test/guinea-pig')
.waitForElementVisible('body', 1000)
.assert.title('I am a page title - Sauce Labs');
},
afterEach: function(client, done) { /* ... */ }
// ... snip ...// ... snip ...
'Guinea Pig Assert Title 1 - A': function(client) {
client
.url('https://saucelabs.com/test/guinea-pig')
.waitForElementVisible('body', 1000)
.assert.title('I am a page title - Sauce Labs');
},
// ... snip ...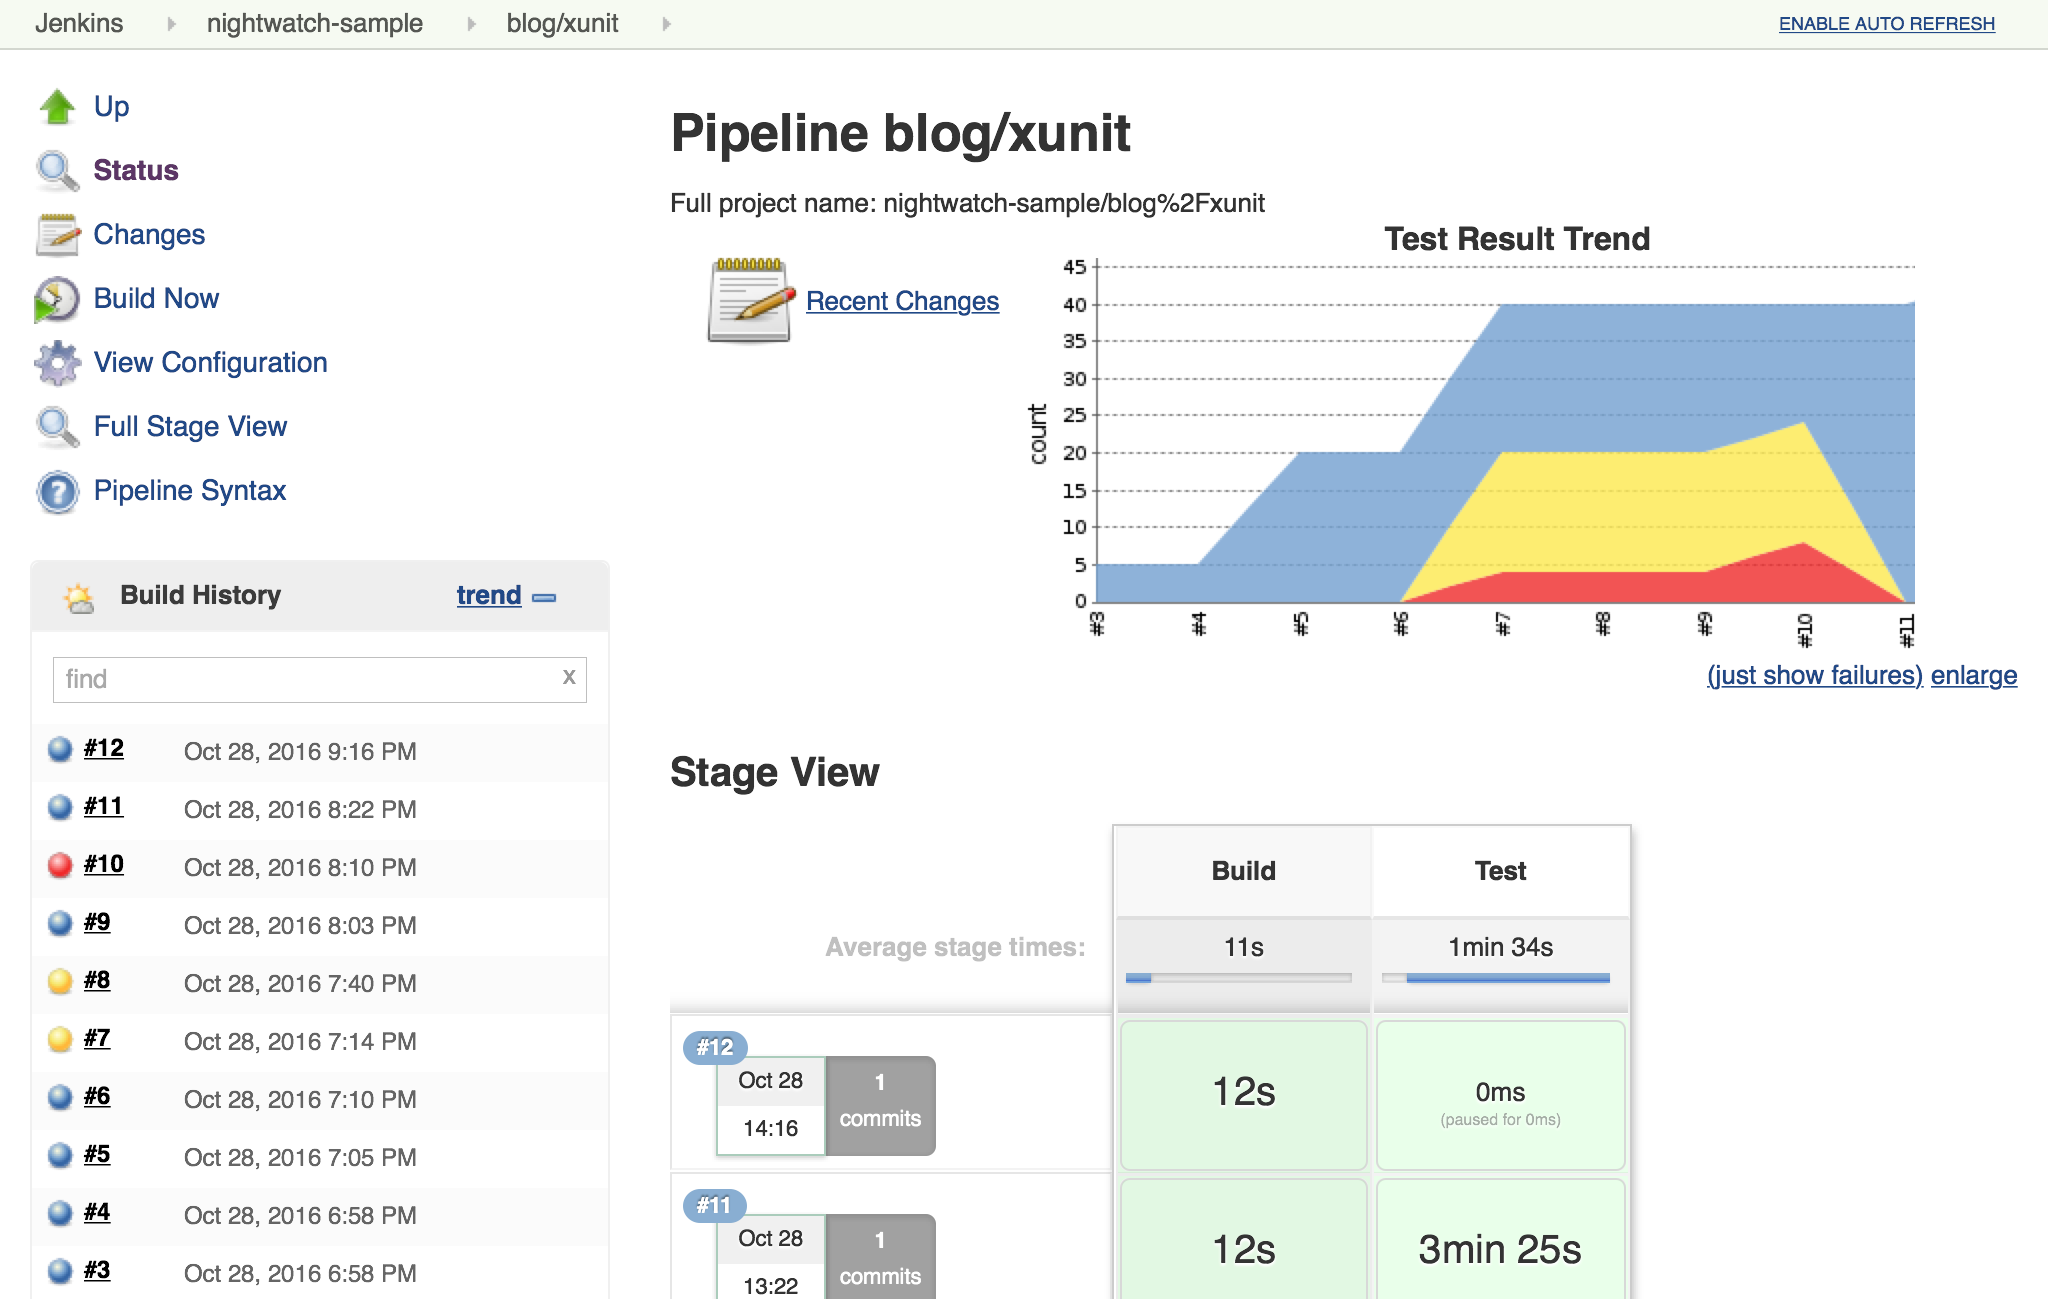
Allow for Flakiness
We’ve all known the frustration of having one flaky test that fails once every ten jobs. You want to keep it active so you can working isolating the source of the problem, but you also don’t want to destablize your CI pipeline or reject commits that are actually okay. You could move the test to a separate job that runs the "flaky" tests, but in my experience that just leads to a job that is always in a failed state and a pile of flaky tests no one looks at.
With the xUnit plugin, we can keep the this flaky test in main test suite but allow the our job to still pass.
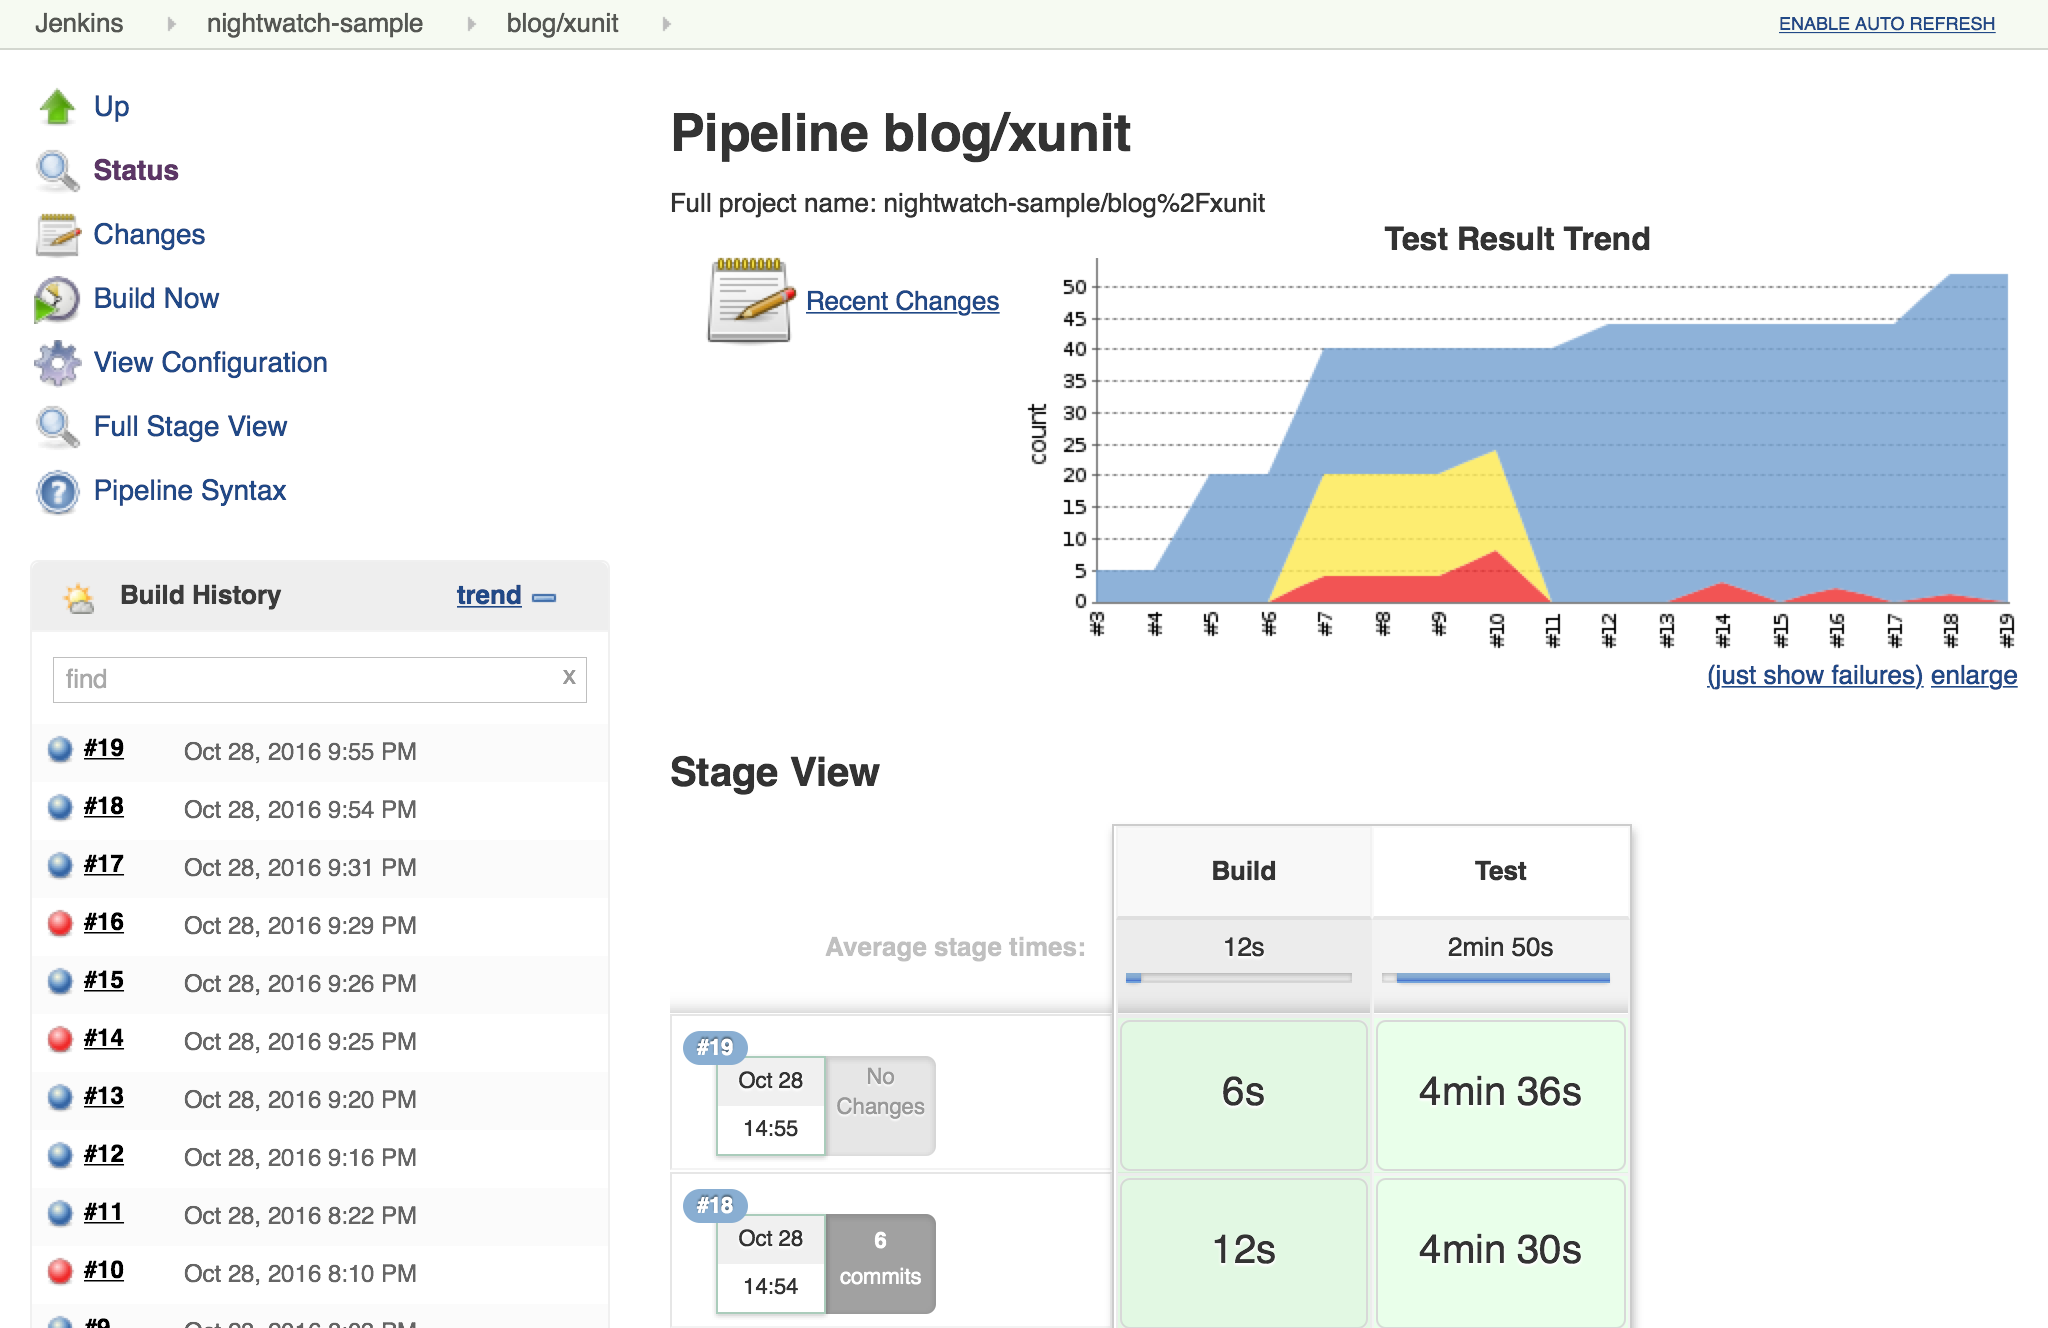
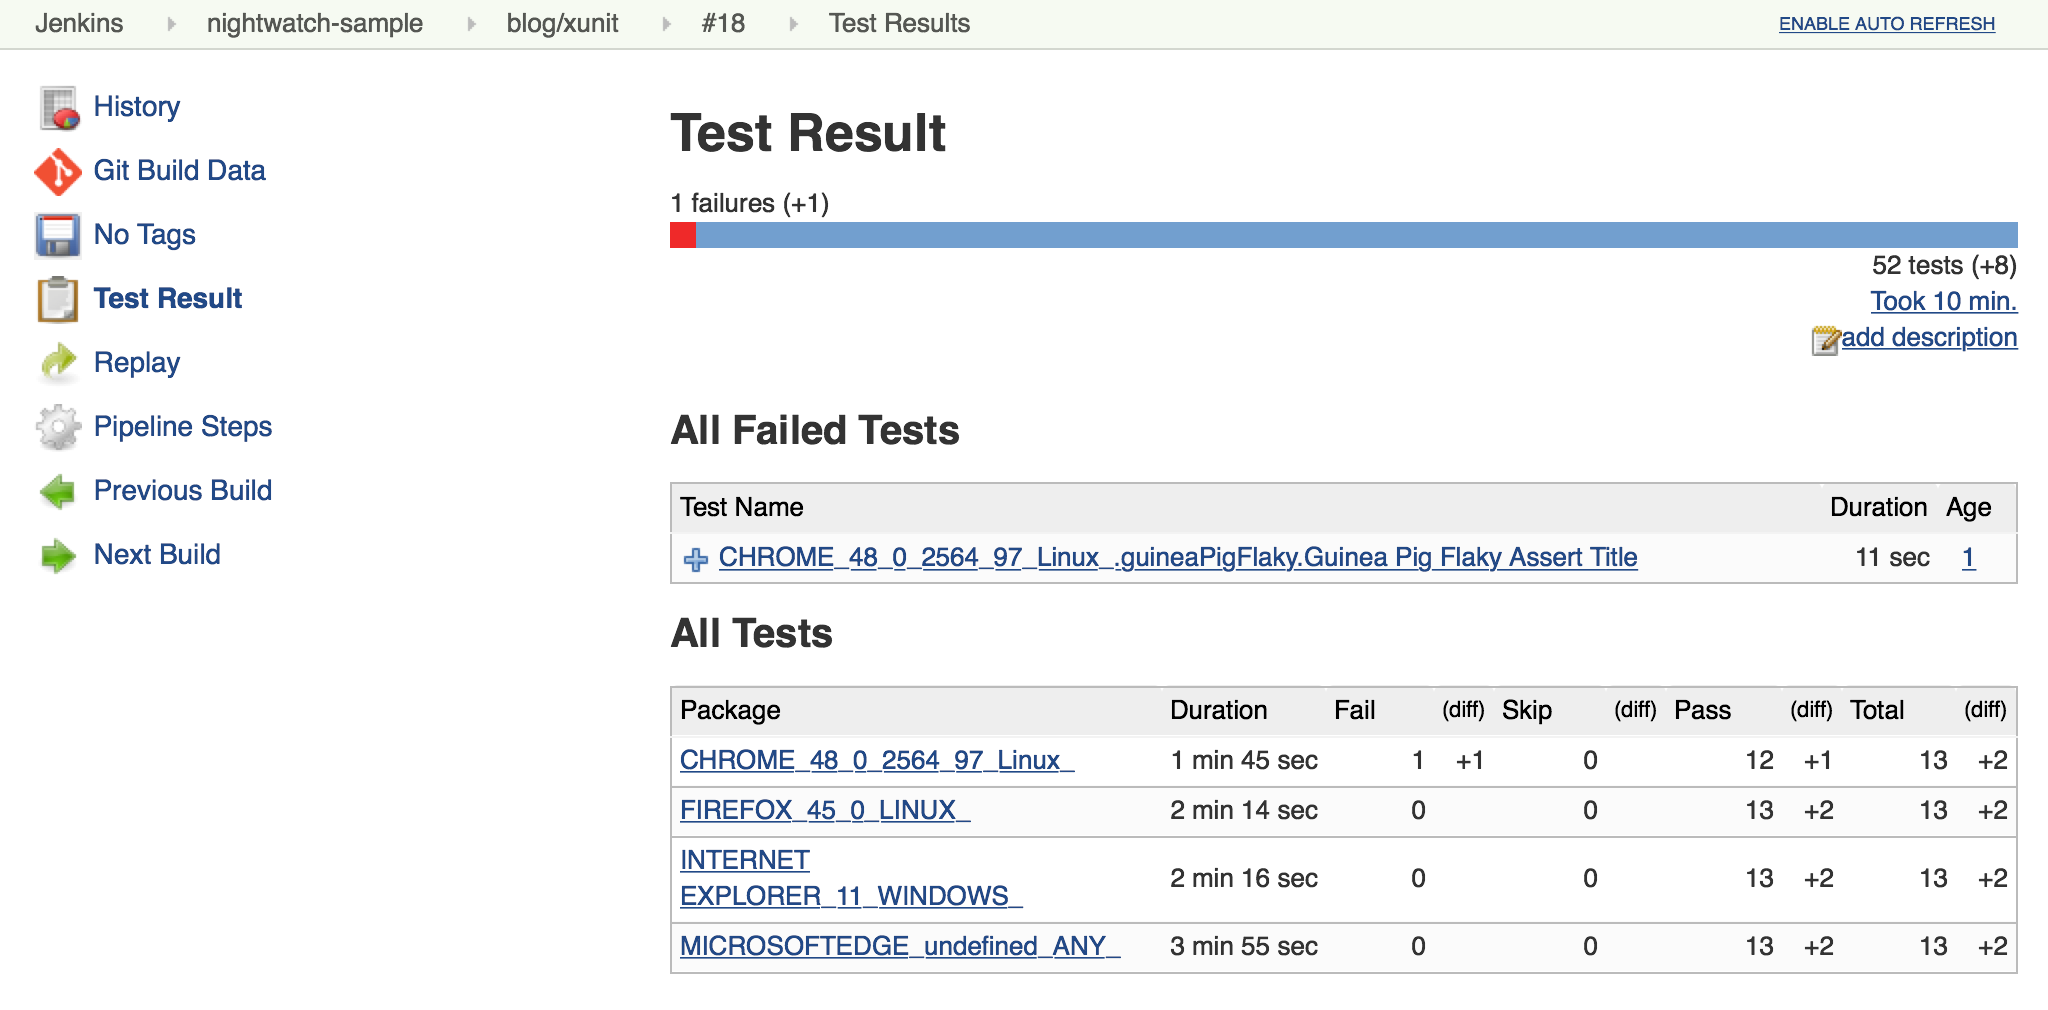
I’ll start by adding a sample flaky test. After a few runs, we can see the test fails intermittently and causes the job to fail too.
// New test file: tests/guineaPigFlaky.js
var https = require('https');
var SauceLabs = require("saucelabs");

module.exports = {

    '@tags': ['guineaPig'],

    'Guinea Pig Flaky Assert Title 0': function(client) {
        var expectedTitle = 'I am a page title - Sauce Labs';
        // Fail every fifth minute
        if (Math.floor(Date.now() / (1000 * 60)) % 5 === 0) {
            expectedTitle += " - Cause failure";
        }

        client
            .url('https://saucelabs.com/test/guinea-pig')
            .waitForElementVisible('body', 1000)
            .assert.title(expectedTitle);
    }

    afterEach: function(client, done) {
        client.customSauceEnd();

        setTimeout(function() {
            done();
        }, 1000);

    }

};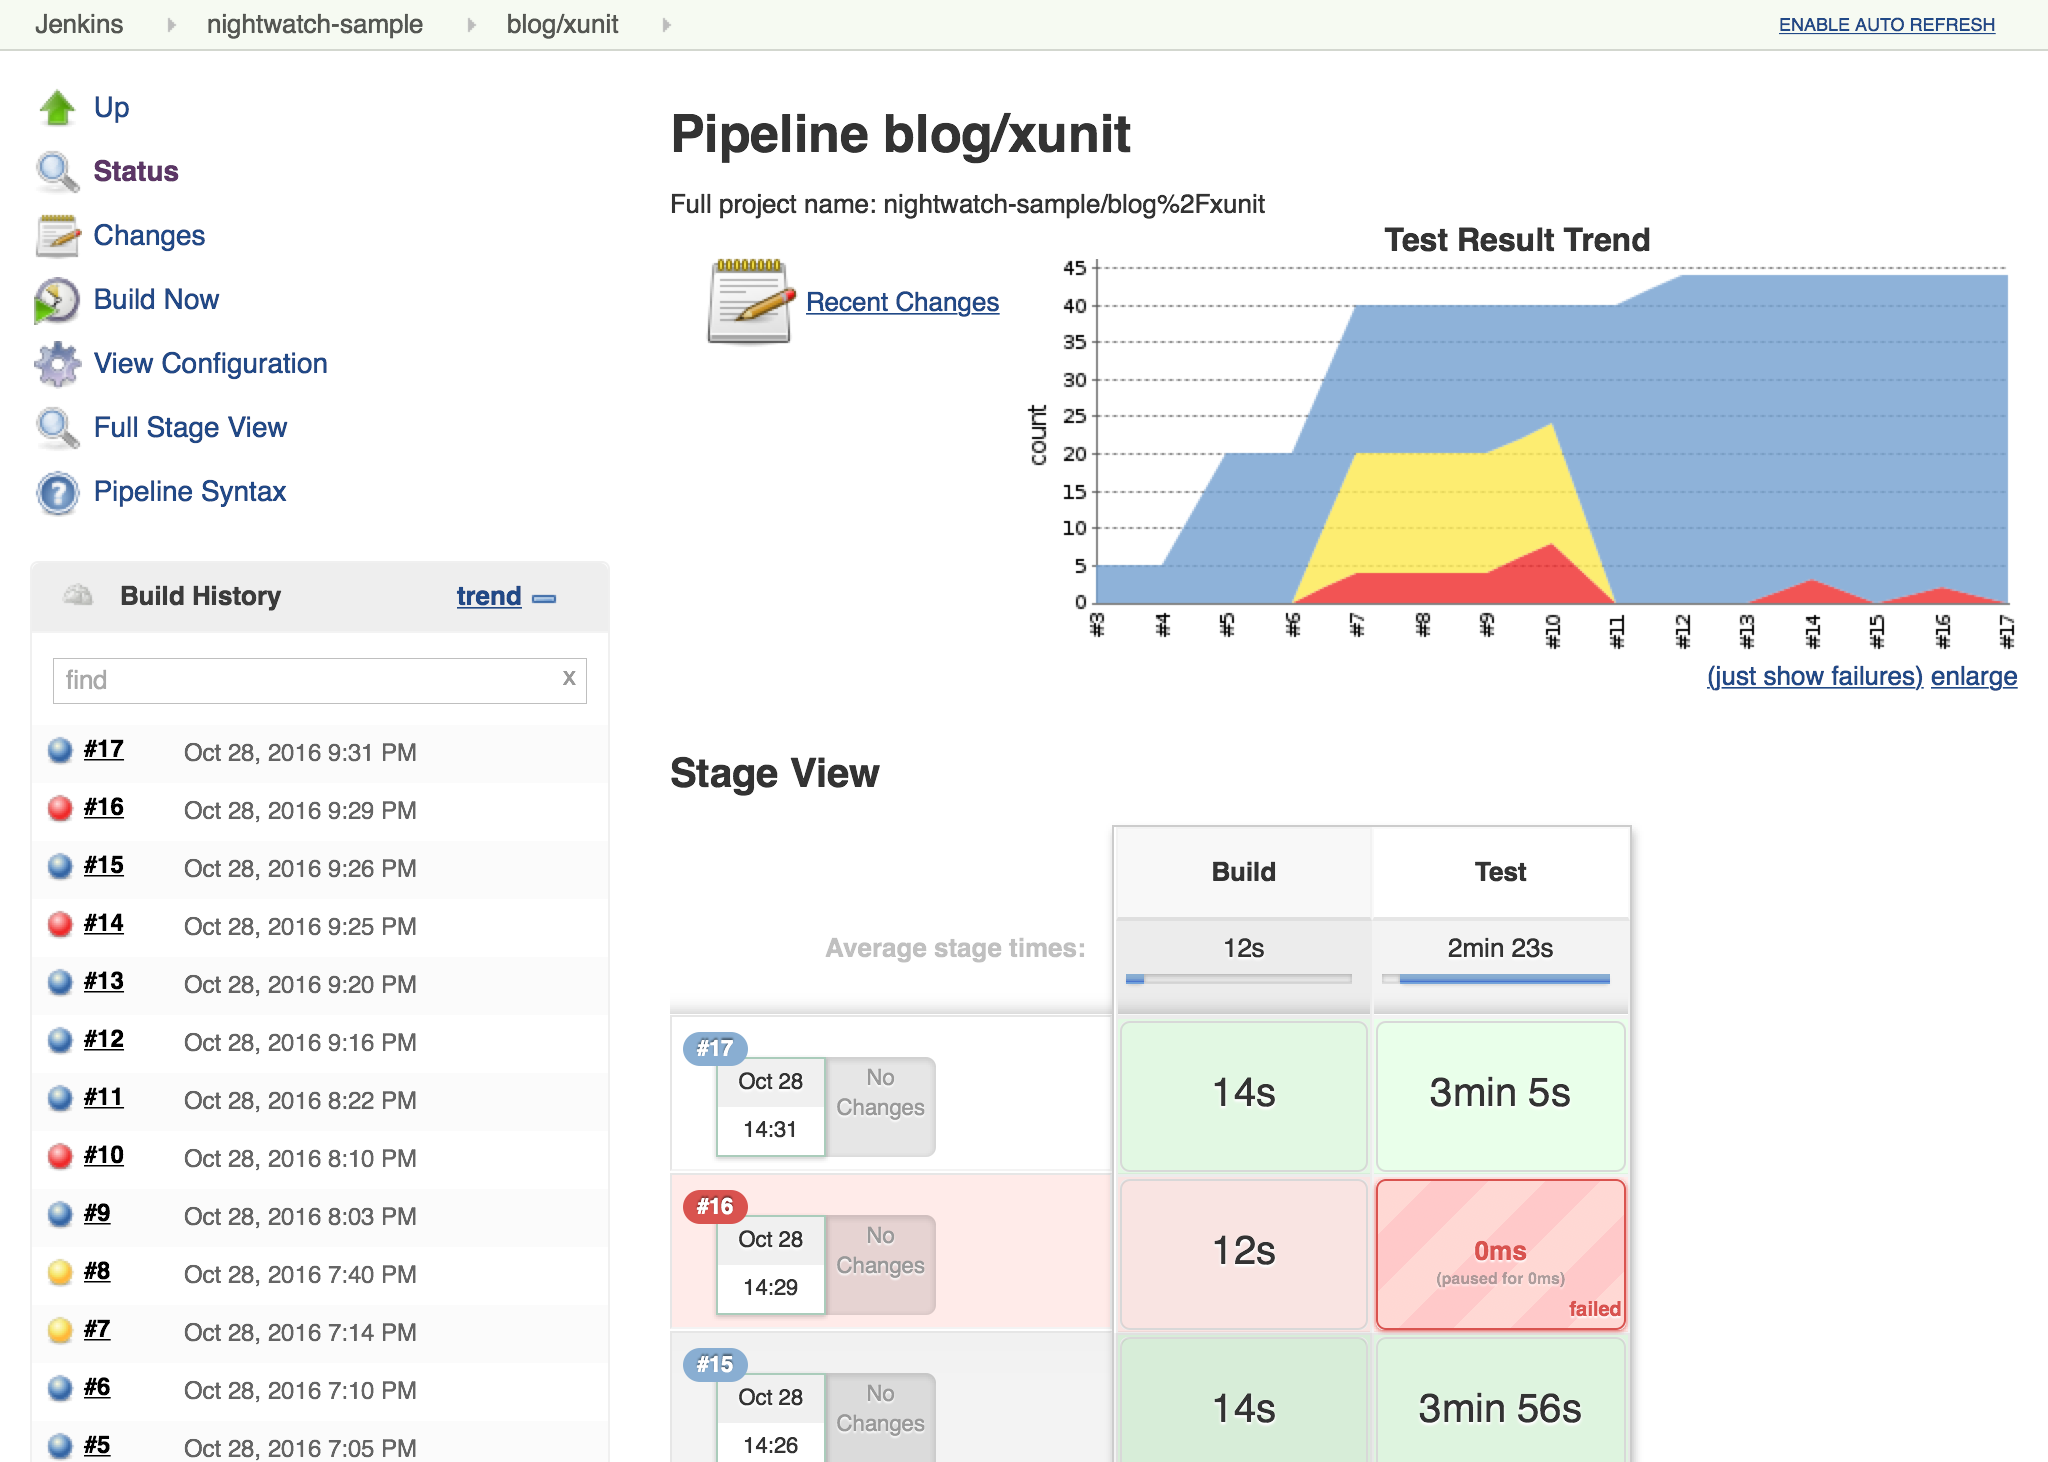
I can almost hear my teammates screaming in frustration just looking at this report. To allow specific tests to be unstable but not others, I’m going to add a guard "suite completed" test to the suites that should be stable, and keep flaky test on it’s own. Then I’ll tell xUnit to allow for a number of failed tests, but no skipped ones. If any test fails other than the ones I allow to be flaky, it will also result in one or more skipped tests and will fail the build.
// The rest of the Jenkinsfile is unchanged.
// Only the xUnit step() call is modified.
step([$class: 'XUnitBuilder',
    thresholds: [
        [$class: 'SkippedThreshold', failureThreshold: '0'],
        // Allow for a significant number of failures
        // Keeping this threshold so that overwhelming failures are guaranteed
        //     to still fail the build
        [$class: 'FailedThreshold', failureThreshold: '10']],
tools: [[$class: 'JUnitType', pattern: 'reports/**']]])// ... snip ...
'Guinea Pig Assert Title 0 - E': function(client) { /* ... */ },
'Guinea Pig Assert Title 0 - Suite Completed': function(client) {
// No assertion needed
},
afterEach: function(client, done) { /* ... */ }
// ... snip ...// ... snip ...
'Guinea Pig Assert Title 1 - E': function(client) { /* ... */ },
'Guinea Pig Assert Title 1 - Suite Completed': function(client) {
// No assertion needed
},
afterEach: function(client, done) { /* ... */ }
// ... snip ...After a few more runs, you can see the flaky test is still being flaky, but it is no longer failing the build. Meanwhile, if another test fails, it will cause the "suite completed" test to be skipped, failing the job. If this were a real project, the test owner could instrument and eventually fix the test. When they were confident they had stabilized the test the could add a "suite completed" test after it to enforce it passing without changes to other tests or framework.
Conclusion
This post has shown how to migrate from the JUnit plugin to the xUnit plugin on an existing project in Jenkins pipeline. It also covered how to use the features of xUnit plugin to get more meaningful and effective Jenkins reporting behavior.
What I didn’t show was how many other formats xUnit supports - from CCPUnit to MSTest. You can also write your own XSL for result formats not on the known/supported list.